※こちらは旧サイトです(新サイトはこちら)
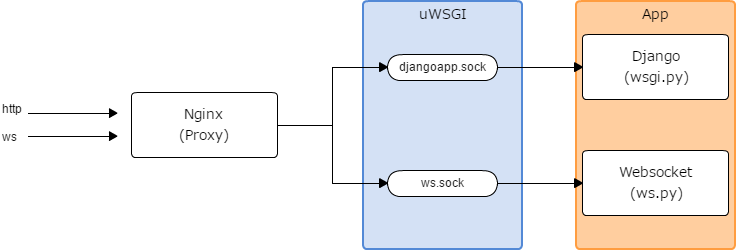
Djangoを、Nginx+uWSGIでUNIX domain socketで動かす運用をしていたので、Websocketも一緒にUNIX domain socketで、uWSGIで管理してしまおうと思って調べたメモ
    $ nginx -v
nginx/1.6.2 $ python --version
Python 3.5.0
$ cat requirements.txt
uWSGI==2.0.14
redis==2.10.5
$ cat /etc/supervisor/conf.d/uwsgi.conf
[program:uwsgi]
command=/path/to/pyenv/versions/3.5.0/envs/uwsgi/bin/uwsgi --master --die-on-term --ini /etc/uwsgi/emperor.ini --emperor /etc/uwsgi/vassals
user=hoge
autostart=true
autorestart=true $ python --version
Python 3.5.2
$ cat requirements.txt
Django==1.10.5
PyMySQL==0.7.10
redis==2.10.5// Django
$ cat /etc/uwsgi/vassals/djangoapp.ini
[uwsgi]
# application setting
base = /var/virtualdomains/example.com/djangoapp
wsgi-file = djangoapp/wsgi.py
module = djangoapp.wsgi:application
# virtualenv setting
chdir = %(base)
virtualenv = /home/hoge/.anyenv/envs/pyenv/versions/djangoapp/
# socket setting
socket = /etc/uwsgi/sockets/%n.sock
chmod-socket = 666
uid = www-data
gid = www-data
logto = /var/log/uwsgi/%n.log
touch-reload = %(base)/../.uwsgi_reload
processes = 2
threads = 2
vacuum = trueWebSocket側は、http-websocketsの指定だけでいいのかと思ってたら、asyncとugreenの指定が必要でちょっとハマりました
よく見たら、Supported concurrency modelsにしっかり書いてありました
// Websocket
$ cat /etc/uwsgi/vassals/ws.ini

[uwsgi]
http-websockets = true
async = 100
ugreen = true

# application setting
base = /var/virtualdomains/example.com/websocket/
wsgi-file = ws.py
module = ws:application

# virtualenv setting
chdir = %(base)
virtualenv = /home/hoge/.anyenv/envs/pyenv/versions/djangoapp/

# socket setting
socket = /etc/uwsgi/sockets/%n.sock
chmod-socket = 666
uid = www-data
gid = www-data

logto = /var/log/uwsgi/%n.log
touch-reload = %(base)/../.websocket_reload// Django
$ cat /etc/nginx/conf.d/django.conf
##
# HTTP server
##
server {
listen 80;
server_name example.com;
location / { try_files $uri @uwsgi; }
location @uwsgi {
include uwsgi_params;
uwsgi_pass unix:/etc/uwsgi/sockets/djangoapp.sock;
}
}// Websocket
$ cat /etc/nginx/conf.d/ws.conf
##
# Websocket server
##
server {
listen 80;
server_name ws.example.com;
location / { try_files $uri @uwsgi; }
location @uwsgi {
include uwsgi_params;
uwsgi_pass unix:/etc/uwsgi/sockets/ws.sock;
}
}wsプロトコルへの対応(Upgradeヘッダの付与、Nginx 1.3.13以降である事)が必要です
Nginxのプロキシ設定にヘッダ情報を追加します
    $ cat /etc/nginx/conf.d/ws.example.com.conf

    ##
    # Proxy server
    ##
    server {
        client_max_body_size 100M;

        listen 80;
        server_name     ws.example.com;

        location / {
            proxy_set_header Host $host;
            proxy_set_header X-Real-IP $remote_addr;
            proxy_set_header X-Forwarded-For $proxy_add_x_forwarded_for;

            // 以下3行を追加
            proxy_http_version 1.1;
            proxy_set_header Upgrade $http_upgrade;
            proxy_set_header Connection "upgrade";

            proxy_pass  http://xxx.xxx.xxx.xxx;
            break;
        }
}あとは、An echo serverのサンプルのままで、単純にオウム返しするだけのスクリプトが動作しました